How to Run a Mainframe in Your Closet
TLDR#
I wrote an Ansible playbook to deploy MVS 3.8j on a Raspberry Pi and connect to it with x3270. Additionally, I use Tailscale for a free secure VPN to connect to this mainframe from wherever I want. This blog post covers my motivation for doing this, why you might also want to do this, and lessons learned. This goes back to a goal of mine for 2026 to build a multiplayer game server in a hybrid cloud environment.
Introduction#
One thing I really like about my job at IBM is that I get to work on interesting and cutting edge mainframe technology. While that may sound like an oxymoron since mainframes have existed for decades, these new Z17s are powerful! Plus when they’re coupled with the new Spyre AI Accelerator (had to plug it), you get to do all sorts of things like inference LLMs on prem. Which was something I’ve had hands on experience recently installing Watsonx Assistant for Z. That could warrant a whole other blog post talking about how interesting that product is and how great it’s going to be for new mainframers to be able to use and learn from.
If you’re curious about how to learn how to work on these machines, your options were pretty limited and information was scarce or hard to search. Now we have all sorts of amazing tools ranging from OOTB agents like Claude to explain concepts in a way tailored to your understanding or structured learning from the IBM Z Xplore Platform (highly recommended for new mainframers). But what happens when you want to take this a step further? Well, there are emulators that do a good job of showing what it’s like to work on your very own mainframe. You can run jobs, customize screens, and tweak to your heart’s content. The one I used for this work is MVS 3.8j TK5.
I think that this is a great learning exercise for anyone trying to work with mainframes because while MVS 3.8j is the predecessor of modern z/OS, there is still a ton of cross over. Additionally, you’ll come to appreciate how much easier z/OS 3.2 is to use. Which is a statement I did not expect to say because I still think of myself as a novice mainframer when compared to my peers who know this OS like the back of their hand in IBM Customer Test. Lastly, you can rest easy knowing that if something gets really screwed up while experimenting, you could easily reset it by re-running the provided Ansible playbook.
High Level Install Steps#
Personally, I think it’s really fun to connect into a system remotely since it better emulates how you would actually connect into a z/OS system. However, if you don’t have a decade-old Raspberry Pi 2b with 1GB of RAM laying around, you can run this on your local development environment and connect in with localhost. Right now, I just connected my Pi to my router and a power supply in my closet.
First, you need to download the MVS 3.8J Turnkey ZIP files which can be found
directly at this
URL. It may also
help to download the
PDF guide,
to read up more about MVS’s requirements. A pro tip I have to offer here is that
if you want to make this a long running project, I would take the PDF + any
other documentation (check inside the extracted folder for a doc/ directory)
and create a project in Claude. That way it can read the docs for you and help
you find the correct commands to run. Like any IBM solution, the documentation
is dense so there’s no harm in using AI here to help you comb through all
that information to find what you need (in my opinion, one of the best use cases
of AI).
If you’re more of a visual learner, I found several youtube channels that helped me learn more about this specific emulator.
Specifically, I used this video from Mainframe Mojo to model my initial playbooks in Ansible (with a bit of tweaking from Claude Code to make it more robust and handle edge cases).
Breaking down that video to get installed and running you need to do the following high level steps:
- Extract the ZIP file to where you want to run the emulator
- Run the script in
<install_dir>/unattended/set_console_mode - Run the
<install_dir>/mvsscript
Note: These can be platform dependent. I ran these on my Pi which was using Raspbian Lite and is based on Debian. I wasn’t able to get this working well on my Macbook M4 because it was being too protective, and I know for a fact the steps for Windows are different because of the file endings present in the extracted directory.
If you don’t want to do this manually, you can just clone my Ansible playbook which works with Debian based systems (or fork and modify it to your distro of choice). It will even create the service in systemd to automatically restart it.
Get Connected#
You can use any type of 3270 emulator to connect in, but I chose x3270. This gave me the c3270 command to run in my terminal and allowed me to connect in. Now I did run into some set up specific problems since I use fancy new fangled terminals like Ghostty with shell integrations and themes. The main problem being that there was this weird white hue to the screen that made it harder to read. You can fix this in two ways, either running in mono or changing the background color like so:
- Run in mono:
c3270 -mono <hostname>:3270(example:c3270 -mono localhost:3270) - Run with default colors:
c3270 -defaultfgbg <hostname>:3270
I prefer running with the default foreground/background because I like colors in my emulator. When there’s an error, it’s easier to spot red text than scan for messages on a potentially crowded screen.
Now you’ll see this welcome screen:
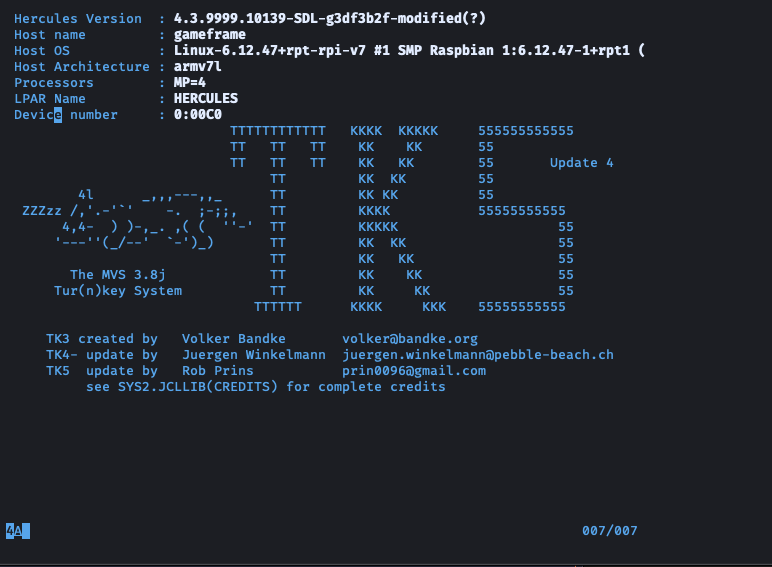
Press enter and it will take you to a typical logon screen:
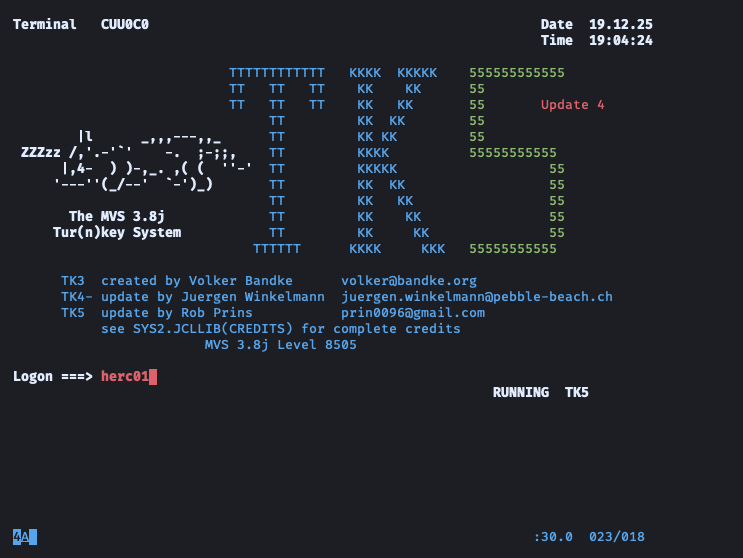
You can use the default credentials for connecting in to either HERC01 or HERC02. Both have the password of CUL8TR. There are also some mere mortal non-admin users you can login to as well.
What’s the difference between MVS and z/OS?#
A decent amount! While there are a lot of similarities since z/OS is built on the same ideas, there are some things to keep in mind.
- Performance has been slower for me, most likely because its running on a decade old tiny Pi. I’m interested to see how well it runs on a new server I’m getting shipped later this month.
- Since this is open source you don’t get the same names of software. RACF is now RAKF, REXX is BREXX, CICS is Intercomm, no dedicated SDSF (you go to panel =3.8 instead!), etc.
- It’s very easy to get “stuck” when trying things out like operator commands. I found myself spamming PF 1 /2 /3 to get back to a state where my input wasn’t restricted.
- Date / time wasn’t immediately synchronized to my host, so I had to modify the
<install_dir>/conf/tk5.cnffile to have the following entries:
TZOFFSET -0600
That code snippet essentially sync’d up the time from UTC to my timezone.
Fun with Messages#
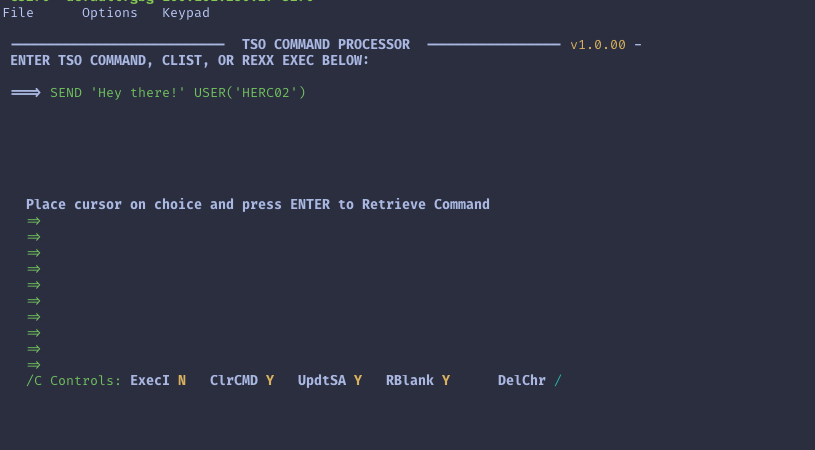
So just a fun way to see how things work, I created two different terminal
sessions with HERC01 and HERC02. One thing you can do on MVS is send messages to
users, say if you need people to logoff because of routine maintenance. So in
HERC01, I navigated to option 6 so that I could go issue/re-issue commands
easily. From there enter SEND ('Hey there!) USER(HERC02).
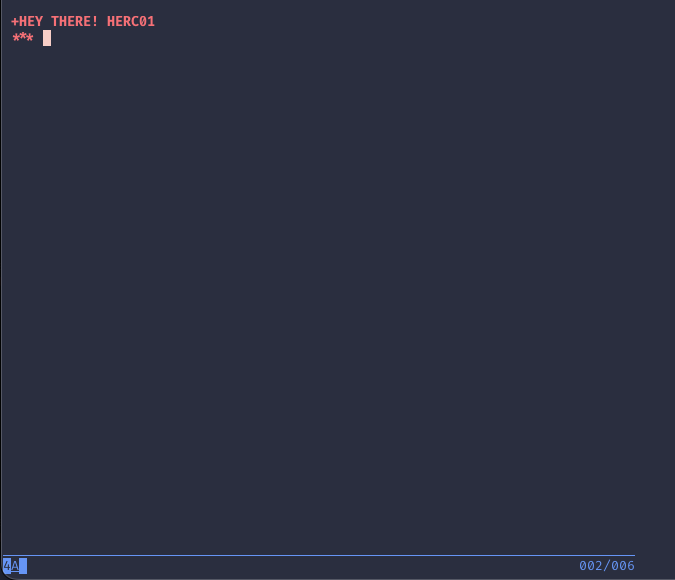
Then I went over to HERC02’s session and pressed enter which showed me the message I sent.
Wrapping Up#
We’re just getting started here, and the example shown above is a simple operation in the grand scheme of things. But in terms of getting started on your mainframe journey, it’s a really cool spot! My next hope is to get more used to the weirdness of MVS compared to modern z/OS. My next step might be starting up HTTPD so that I can communicate via REST with whatever services I stand up outside of this. I also want to get familiar with using VSAM as my database here since MVS doesn’t have things like DB2. Anyways, hope y’all enjoyed this quick tutorial and learned something new about mainframes!